
ELK Lesson 30:整合Open Distro for Elasticsearch的Kibana Alerting模組
What Is Open Distro for Elasticsearch
官方網站:https://opendistro.github.io/for-elasticsearch/
Open Distro for Elasticsearch是AWS從Elasticsearch分岔出來的產品,AWS免費開放了許多在Elasticsearch付費功能,同時也加上了Elasticsearch沒有的功能,不過這也讓Elasticsearch與AWS起了爭執。不過,在Apache的授權下,其實使用者是最大贏家,免費又有豐富功能的選擇總是會被大家看見,但在Elasticsearch 7.10.2以後,就沒有這種好康了,Elasticsearch修改了授權,Open Distro for Elasticsearch也就無以為繼,AWS後續將Open Distro for Elasticsearch改為OpenSearch (詳見OpenSearch 1.0發佈啦!)產品,這就是後話了。
安裝Open Distro for Elasticsearch Alerting模組
步驟1:安裝Alerting for Elasticsearcch。
$ cd /usr/share/elasticsearch/
$ sudo bin/elasticsearch-plugin install https://d3g5vo6xdbdb9a.cloudfront.net/downloads/elasticsearch-plugins/opendistro-alerting/opendistro-alerting-1.13.1.0.zip

-> Installing https://d3g5vo6xdbdb9a.cloudfront.net/downloads/elasticsearch-plugins/opendistro-alerting/opendistro-alerting-1.13.1.0.zip
-> Downloading https://d3g5vo6xdbdb9a.cloudfront.net/downloads/elasticsearch-plugins/opendistro-alerting/opendistro-alerting-1.13.1.0.zip
[=================================================] 100%
@@@@@@@@@@@@@@@@@@@@@@@@@@@@@@@@@@@@@@@@@@@@@@@@@@@@@@@@@@@
@     WARNING: plugin requires additional permissions     @
@@@@@@@@@@@@@@@@@@@@@@@@@@@@@@@@@@@@@@@@@@@@@@@@@@@@@@@@@@@
* java.lang.RuntimePermission createClassLoader
* java.lang.RuntimePermission getClassLoader
* java.net.NetPermission getProxySelector
* java.net.SocketPermission * connect,resolve
See http://docs.oracle.com/javase/8/docs/technotes/guides/security/permissions.html
for descriptions of what these permissions allow and the associated risks.

Continue with installation? [y/N]y
-> Installed opendistro-alerting步驟2:安裝Alerting for Job scheduler。
$ sudo bin/elasticsearch-plugin install https://d3g5vo6xdbdb9a.cloudfront.net/downloads/elasticsearch-plugins/opendistro-job-scheduler/opendistro-job-scheduler-1.13.0.0.zip

-> Installing https://d3g5vo6xdbdb9a.cloudfront.net/downloads/elasticsearch-plugins/opendistro-job-scheduler/opendistro-job-scheduler-1.13.0.0.zip
-> Downloading https://d3g5vo6xdbdb9a.cloudfront.net/downloads/elasticsearch-plugins/opendistro-job-scheduler/opendistro-job-scheduler-1.13.0.0.zip
[=================================================] 100%
-> Installed opendistro-job-scheduler步驟3:安裝Alerting for Kibana。
$ cd /usr/share/kibana/
$ sudo bin/kibana-plugin install https://d3g5vo6xdbdb9a.cloudfront.net/downloads/kibana-plugins/opendistro-alerting/opendistroAlertingKibana-1.13.0.0.zip --allow-root

Attempting to transfer from https://d3g5vo6xdbdb9a.cloudfront.net/downloads/kibana-plugins/opendistro-alerting/opendistroAlertingKibana-1.13.0.0.zip
Transferring 7373135 bytes....................
Transfer complete
Retrieving metadata from plugin archive
Extracting plugin archive
Extraction complete
Plugin installation complete步驟4:重啟Elasticsearch與Kibana。
$ systemctl restart elasticsearch
$ systemctl restart kibana步驟5:在Kibana目錄中就可以看到Open Distro for Elasticsearch頁籤中的Alerting項目。

設定E-Mail發送通道
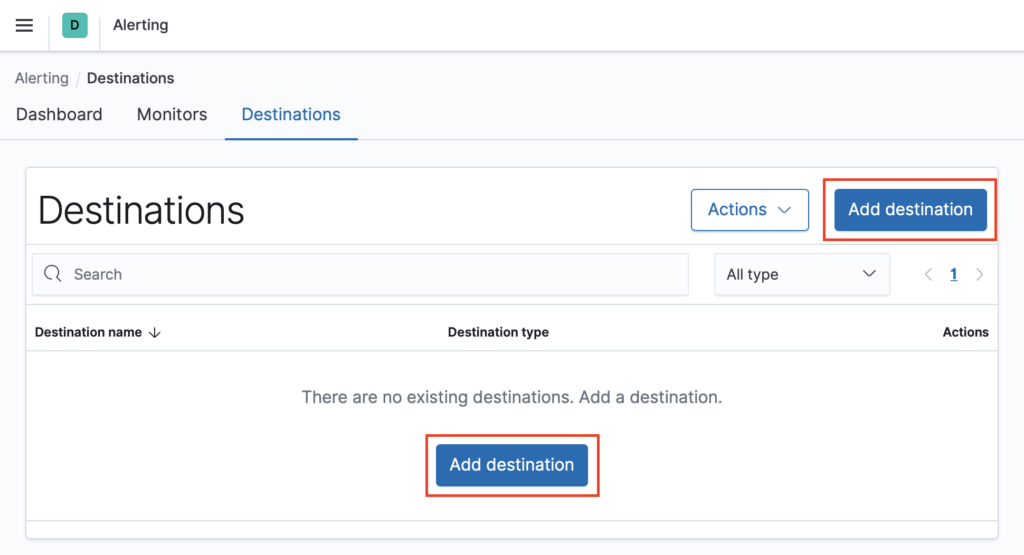
步驟1:在Destinations畫面中,點選”Add destination”,如下圖紅匡處:
步驟2:填入表單內相對應的資訊,Type選擇Email,點選”Manage Sender”新增發信設定。

步驟3:填入發信設定的名稱、發信Email帳號、SMTP主機…等,完成後點選”Save”存檔。

設定告警規則
步驟1:點選”Monirots”畫面中的”Create monitor”,如下圖紅匡處:

步驟2:設定監控,這個監控的目標是1分鐘內CPU使用率平均高於90%,如下圖最下方的綠色字 :

除了Email外呢?
Open Distro for Elasticsearch的Alert模組除了Email告警外,也支援Amazon Chime、Slack、Webhook,方式其實滿多元的,尤其是Webhook,等於支援透過API與其他網站、服務整合,非常方便!
~ END ~