
Elastic Stack 8 EP 2:Elasticsearch Cluster安裝與基本設定
Elasticsearch Cluster 架構說明
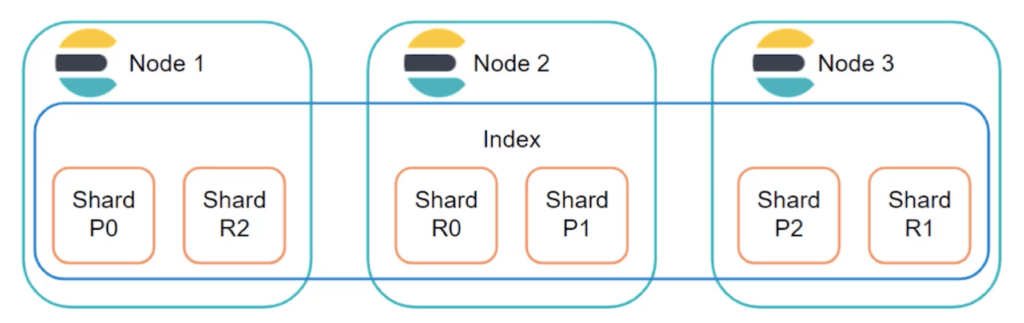
Elasticsearch CLuster是以多個Elasticsearch節點透過網路同步達到叢集化,並能快速且穩定的切割及同步資料,確保服務及資料都具高可用性,如下圖,一般會使用至少3個節點,並同時單任Master Node與Data Node。
本文會以最低3個節點來搭建Elasticsearch Cluster,每個節點都會擔任所有角色,包括Master Node、Data Node、Ingest Node…等。
安裝環境
將以虛擬機來模擬安裝環境,規格如下:
- OS:Rocky Linux 8.5
- CPU:2 Cores
- Memory:2 GB
- Disk:20 GB
- IP:
- lab-elk-1.example.com:192.168.44.101/24
- lab-elk-2.example.com:192.168.44.102/24
- lab-elk-3.example.com:192.168.44.103/24
- 版本:
- OpenJDK:11
- Elasticsearch:8.2.1
前置準備
以下步驟是每個節點都要執行的,一個都不能缺喔!
第1步:安裝Java的Open JDK 11版本,並確認安裝成功。
$ yum install java-11-openjdk.x86_64 -y
$ java --version
openjdk 11.0.15 2022-04-19 LTS
OpenJDK Runtime Environment 18.9 (build 11.0.15+10-LTS)
OpenJDK 64-Bit Server VM 18.9 (build 11.0.15+10-LTS, mixed mode, sharing)第2步:確定環境中有DNS或設定/etc/hosts,讓主機之間可以正常解析主機名稱。
$ vi /etc/hosts
192.168.44.101 lab-elk-1 lab-elk-1.example.com
192.168.44.102 lab-elk-2 lab-elk-2.example.com
192.168.44.103 lab-elk-3 lab-elk-3.example.com第3步:下載Elasticsearch,官方網址:link。
$ cd /tmp/
$ wget https://artifacts.elastic.co/downloads/elasticsearch/elasticsearch-8.2.1-x86_64.rpm第4步:安裝Elasitcsearch。
$ yum install elasticsearch-8.2.1-x86_64.rpm -y安裝成功後畫面會有以下資訊,其中elastic的密碼一定要先記下來,避免忘記就麻煩了,另外也提供諸如產生Token與重新設定密碼、節點設定的指令提示,稍等會用到。
--------------------------- Security autoconfiguration information ------------------------------

Authentication and authorization are enabled.
TLS for the transport and HTTP layers is enabled and configured.

The generated password for the elastic built-in superuser is : 4QjsTHnktuBm5mH_OTQC

If this node should join an existing cluster, you can reconfigure this with
'/usr/share/elasticsearch/bin/elasticsearch-reconfigure-node --enrollment-token <token-here>'
after creating an enrollment token on your existing cluster.

You can complete the following actions at any time:

Reset the password of the elastic built-in superuser with
'/usr/share/elasticsearch/bin/elasticsearch-reset-password -u elastic'.

Generate an enrollment token for Kibana instances with
 '/usr/share/elasticsearch/bin/elasticsearch-create-enrollment-token -s kibana'.

Generate an enrollment token for Elasticsearch nodes with
'/usr/share/elasticsearch/bin/elasticsearch-create-enrollment-token -s node'.

-------------------------------------------------------------------------------------------------重要提示:新版本已經會自動產生密碼、憑證…等用於安全性設定的所有要素,不需要自己去生出那些複雜的憑證並加以設定。
設定一個單節點Elasticsearch Cluster
在lab-elk-1.example.com這個節點執行以下安裝動作。
第1步:調整Elasticsearch的設定檔,位於/etc/elasticsearch/elasticsearch.yml,內容如下:
# ======================== Elasticsearch Configuration =========================
#
cluster.name: lab-elk-cluster
node.name: lab-elk-1.example.com
path.data: /var/lib/elasticsearch
path.logs: /var/log/elasticsearch
network.host: 192.168.44.101
http.port: 9200
discovery.seed_hosts: ["lab-elk-1.example.com"]
xpack.security.enabled: true
xpack.security.enrollment.enabled: true
xpack.security.http.ssl:
  enabled: true
  keystore.path: certs/http.p12
xpack.security.transport.ssl:
  enabled: true
  verification_mode: certificate
  keystore.path: certs/transport.p12
  truststore.path: certs/transport.p12
cluster.initial_master_nodes: ["lab-elk-1.example.com"]
http.host: 192.168.44.101
transport.host: 192.168.44.101第2步:啟動Elasticsearch。
$ systemctl start elasticsearch第3步:創建用於加入Cluster的Token。
$ /usr/share/elasticsearch/bin/elasticsearch-create-enrollment-token -s node

eyJ2ZXIiOiI4LjIuMSIsImFkciI6WyIxOTIuMTY4LjQ0LjEwMTo5MjAwIl0sImZnciI6IjIxZWMxOWE3ZWI2NWIxYWRiM2YwYjU0MGYwNjFlMzNiMTQ3NmJjMDJmZjhhOWViYTljMzdlNGVjZDAxNGQ0NTMiLCJrZXkiOiJtNUZtQzRFQjhSbU5vbUIyZzh1YzpET0ZpYWtndlEwZUdkSXNQS2ctc1RRIn0=
這個Token只能使用30分鐘,過時了,就必須重新執行上述指令再取得一次。
將其他節點加入叢集
在任何其他的節點實施以下設定,在此以第2的節點lab-elk-2.example.com為例!
第1步:安裝Elasticsearch。
$ yum install elasticsearch-8.2.1-x86_64.rpm -y此步驟就不需要特別既下安裝時產生的預設密碼了,因為等等就會把相關設定清除掉。
第2步:搭配剛剛獲取用以加入叢集的Token配合指令執行節點重新設定,回覆”y”即可自動執行。
$ /usr/share/elasticsearch/bin/elasticsearch-reconfigure-node --enrollment-token eyJ2ZXIiOiI4LjIuMSIsImFkciI6WyIxOTIuMTY4LjQ0LjEwMTo5MjAwIl0sImZnciI6IjIxZWMxOWE3ZWI2NWIxYWRiM2YwYjU0MGYwNjFlMzNiMTQ3NmJjMDJmZjhhOWViYTljMzdlNGVjZDAxNGQ0NTMiLCJrZXkiOiJtNUZtQzRFQjhSbU5vbUIyZzh1YzpET0ZpYWtndlEwZUdkSXNQS2ctc1RRIn0=

This node will be reconfigured to join an existing cluster, using the enrollment token that you provided.
This operation will overwrite the existing configuration. Specifically:
  - Security auto configuration will be removed from elasticsearch.yml
  - The [certs] config directory will be removed
  - Security auto configuration related secure settings will be removed from the elasticsearch.keystore
Do you want to continue with the reconfiguration process [y/N]y第3步:回到lab-elk-1.example.com節點,將設定(elasticsearch.yml)內的”discovery.seed_hosts”與”cluster.initial_master_nodes”改為所有叢集的清單,如下:
#Before
discovery.seed_hosts: ["lab-elk-1.example.com"]
cluster.initial_master_nodes: ["lab-elk-1.example.com"]


#After
discovery.seed_hosts: ["lab-elk-1.example.com", "lab-elk-2.example.com", "lab-elk-3.example.com"]
cluster.initial_master_nodes: ["lab-elk-1.example.com", "lab-elk-2.example.com", "lab-elk-3.example.com"]第4步:重新啟動lab-elk-1.example.com的Elasticsearch。
$ systemctl restart elasticsearch註:僅餘每次修改設定時才需要重新啟動,建議一次增加多個節點的設定避免一直重啟。
第5步:修改elasticsearch.yml設定檔案。
# ======================== Elasticsearch Configuration =========================
#
cluster.name: lab-elk-cluster
node.name: lab-elk-2.example.com
path.data: /var/lib/elasticsearch
path.logs: /var/log/elasticsearch
network.host: 192.168.44.102
http.port: 9200
discovery.seed_hosts: ["lab-elk-1.example.com", "lab-elk-2.example.com", "lab-elk-3.example.com"]
xpack.security.enabled: true
xpack.security.enrollment.enabled: true
xpack.security.http.ssl:
  enabled: true
  keystore.path: certs/http.p12
xpack.security.transport.ssl:
  enabled: true
  verification_mode: certificate
  keystore.path: certs/transport.p12
  truststore.path: certs/transport.p12
cluster.initial_master_nodes: ["lab-elk-1.example.com", "lab-elk-2.example.com", "lab-elk-3.example.com"]
http.host: 192.168.44.102
transport.host: 192.168.44.102第6步:啟動Elasticsearch。
$ systemctl start elasticsearch檢查節點與叢集
檢查節點
在瀏覽器輸入https://{ip or hostname}:9200/,信任憑證並輸入帳號”elastic”及密碼,出現如下圖的資訊及代表該節點正常運作。

檢查叢集
用瀏覽器連線到任何一個節點,並輸入以下網址:https://{ip or hostname}:9200/_cluster/health,信任憑證並輸入帳號”elastic”及密碼,出現如下圖的資訊及代表叢集正常運作。

從上圖可以看到一些重要資訊:
- cluster_name:叢集名稱
- status:叢集狀態
- number_of_nodes:節點數量
- number_of_data_nodes:資料節點數量
- …
以此判斷節點是否健康。
~ END ~